Android translation into Russian. How to change the language to Russian in the phone or tablet? How to add a language on Android
Many users buy smartphones and tablets with Android, with an English interface.
Fortunately, most Android devices offer built-in support for changing the display language, and the whole process requires just a few steps.
Note: This guide has been tested on htc and samsung phones with Android 7 Nougat and Android 6 Marshmallow.
In general, the procedure is similar on all Android devices, even if you have a different version.
Step 1 change tongue - open Settings
You can open the Settings application on your Android smartphone or tablet in several ways, one of which is by clicking on the Settings icon in the list of applications.
Step 2 - find the language settings and text input
Scroll through the list of parameters until you find the option: “Language and input”.

After clicking on it, a tab will open, where the first item will see the active interface (by default) used to display the Android operating system - “Language”.

Step 3 change the language - add Russian
After clicking on Language, you’ll see settings such as display language, spell checking, keyboard interface settings, and much more. To change, click on the “Add a Language” button.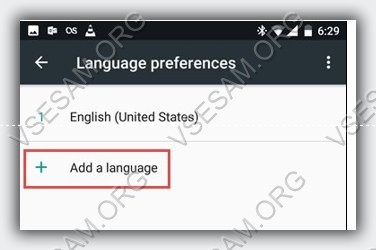
You will see a list of all languages \u200b\u200bavailable for your Android device. Scroll down until you find the language that interests you, and click on its name.

Your selection will be added to the list. If you want to add another, repeat the instructions in this section to add as many as you want.
Step 4 change the language to android - select the one you need
To change, open the “Language and input” option again, click on Language and select which one you want to use.
Attention! The keyboard requires additional actions - you will see them on the “Language” tab or if you selected the Russian interface, then on “Language”.
NOTE: in third-party applications that you installed on your smartphone or tablet, you may need to make this setting within each application separately. Successes.
The Google Android operating system has built-in support for dozens of different languages, but this undoubted advantage can sometimes become a serious problem for novice users. Especially in these days, when there were many good Chinese tablets and smartphones on sale, which in quality are almost in no way inferior to their more eminent competitors.
We all faced a situation when our new tablet or smartphone suddenly started to work not as good as it was right after its purchase, or when we inexperienced “got it” with its settings. Usually, in this case, the first thing that experienced users advise us is to reset to factory settings. We do a reset and find with horror that now the tablet’s interface has switched to Chinese, and we can’t understand anything in this set of hieroglyphs.
Yes, we know that the Android language can be easily switched to Russian or any other, but looking at all these obscure hieroglyphs, we do not understand where this option can be found.
In fact, everything is very simple.
How to return the Russian language on a tablet with the Android operating system:
1. The first thing you need to do is open the settings menu. To do this, simply open the quick settings / notifications menu - in Android 4.0 or 4.1, which you will find in the lower right corner of the screen. If you are using Android 4.2, you can slide it from the top right of the screen.
2. Now find the settings menu icon. It looks like three horizontal lines with vertical notches (in earlier versions of Android) or a gear icon (in Android 4.4 KitKat and higher):
Click on it to enter the Android settings menu.
3. Here you will see a list of options in an incomprehensible language. Not paying attention to what is written there, we are looking for a line with an icon in the form of the letter A with three dots or in the form of the globe - in new versions of Android:
Click on it to enter the language settings menu.
4. In the next menu, click on the first line.

5. A list of languages \u200b\u200bwill open, the name of each of which is written in its corresponding language. For example, English is designated as “English”, and Russian as “Russian”
In other words, it will be very easy for you to find a language that you understand - just select it from the list of options.
6. After you select your option from the list, the system language will instantly switch to a format that you understand.
Note. You can also find the settings menu shortcut shown in the second paragraph in the application panel (where there are icons of all applications installed on your tablet or phone).
After buying a phone or tablet, some people encounter a problem - you cannot type text messages in Russian. How to fix this problem? There are three ways to solve this problem:
1. Toggle standard keyboard layout. This method will only help if Russian is installed on the device. Usually, all available languages \u200b\u200bare installed on the Android operating system, and the default language is the one that matches the location. If the default phone or tablet is English or Chinese, then to change it to Russian, go to "Settings" and then to the "Language and input" section. Depending on the model of the device on Android, it may be called " Language and keyboard"or just" Language. "
After clicking on the "Language and input" item, a list of keyboards and input methods will open. Here it is necessary select the "settings" icon of the one you are using. She is ticked. After clicking on the "Settings" button of this keyboard in the window that opens, select the "Input Language" section and set a mark in front of the Russian language. So you added russian language on the Android device in which it has already been installed. 
Now you need to change the language default into Russian. To do this, go back to "Settings", click on "Language and input" and open the "Default" section. After that, a window will open in which you need to select the Russian language and then it will be used by default on your phone or tablet. This way of changing the language changes not only the input language, but also the language design of the entire system.
2. Install app. If the Russian language is not in the list of your phone or tablet, then adding it in the standard way will fail. In this case, you will have to Russify the device to Android, that is change system language into Russian using the MoreLocale2 application. It is better to download it from the Play Store.
At the same time, on phones and tablets with Android version 4.2 and higher, in addition to installing the program MoreLocale2 have to remove protection to change the configuration. To do this, install the console aDB application to the computer and driver for your phone model. Next, connect your phone or tablet to your computer through and give MoreLocale2 the right to change the configuration of your device. Then it remains only to disconnect the phone or tablet from the computer and Russify devices using this program.
After installing it, several different windows will appear, among them you need to select "Custom Locale" and enter "Russian" in the first line, and "Country" in the second line. Next, you need to specify the country of residence and confirm the action by clicking on the "Set" button. After that, the Android phone or tablet is completely Russified.
For the keyboard of your device to be in Russian, you need to download any Russian keyboard from the Play Store and install it. Then go to "Menu - Settings - Language and input", and there, in the "Keyboard and input methods" section, select the installed keyboard. 
3. device. This method is the most difficult and therefore it is worth resorting to it only in cases where attempts to change the language to Russian by the previous two methods have not yielded results. To Russify your phone or tablet using flashing, you need to download a special program for your device to your computer. Then connect the computer to the Android device with a USB flash cable with a COM port emulator.
Describe this method in detail russification we will not, since without special skills it is strongly not recommended to engage in self-flashing. Instead of such an initiative, it is better to contact the service center, where professional specialists will help russify the phone or tablet by flashing for a moderate fee.
