How to take a photo in a community horizontally. Video lesson: how to make a menu in a VKontakte group
Secrets of Vkontakte is a new cycle of blog publications in which I will reveal the intricacies of creating communities and groups social network In contact with. I will show you both technical and organizational issues... Together we will learn how to create beautiful and popular communities on the largest social network on the Russian Internet. By the way, if you don't have a Vkontakte community yet, watch the video.
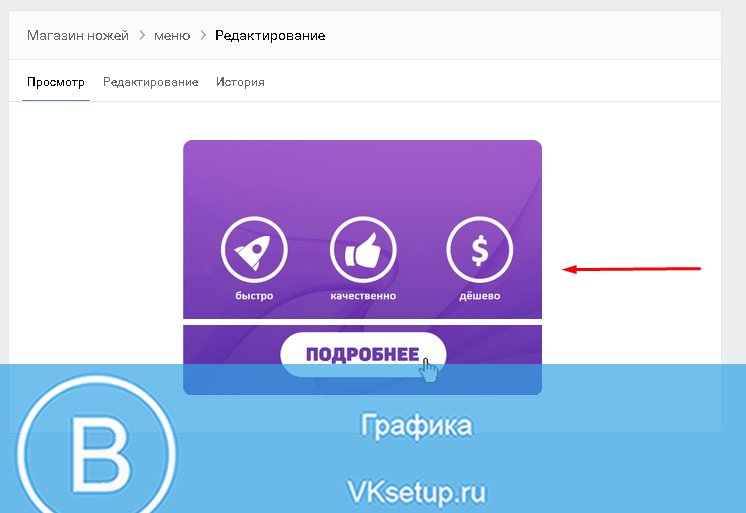
Today I will show you how to create a beautiful unified Avatar + Menu block. You've probably seen such beautifully designed groups, where the menu and the avatar are one picture.
Looks pretty nice, doesn't it? Despite the seeming complexity, everyone can make such a block in their group. At the same time, you no need to know the secrets of Photoshop... I will show you how to do this in a regular graphics editor. Paint that is on every computer.
So, we need:
- a picture from which we will make a group avatar and a menu;
- graphic editor Paint;
- program Rect, for measuring the width and height of the menu.
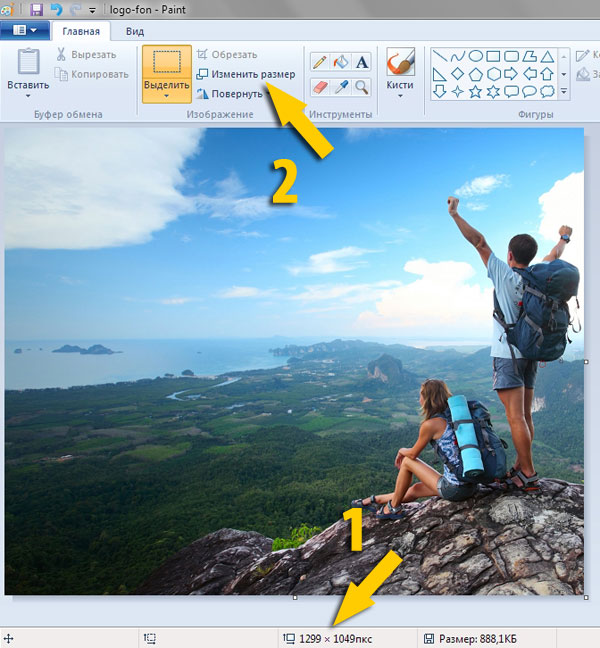
We open the Paint editor and our prepared picture. The picture must be no more than 799 px in height and no less than 600 px in width. Arrow number 1 in the screenshot, I indicated the place where you can look at the current size of the picture. And arrow number 2 is a tool with which you can change these dimensions.
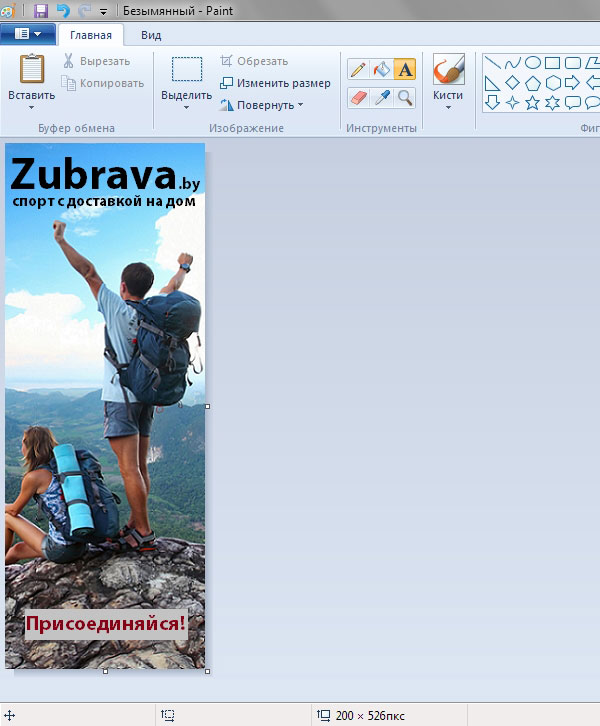
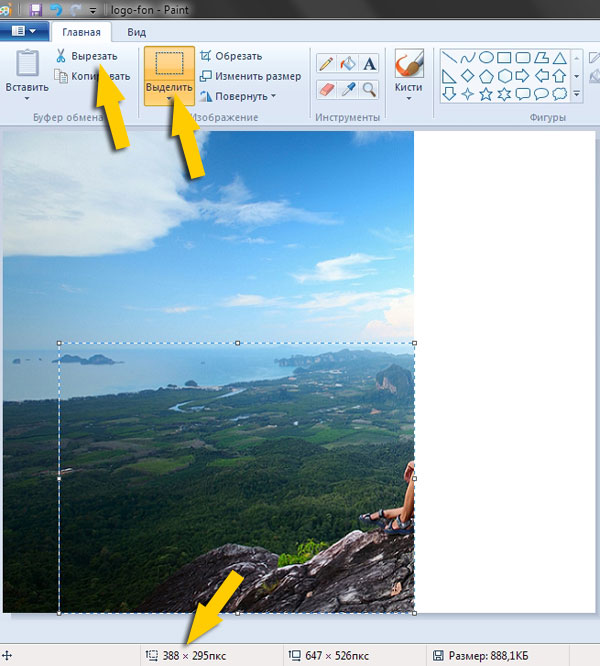
Having received the size of the picture that suits us, we cut out an avatar from it. To do this, use the "Select" tool (arrow number 3). Select an area with a width of 200 px (arrow number 4 shows where you can follow the width of the selected area). Cut out this part of the picture (arrow number 5).

Without closing the current Paint, start another one. We insert into it our cut out part of the picture. This will be the avatar of our Vkontakte group. We make attractive and enticing inscriptions on it and save it as a PNG image.
After that, the avatar can already be uploaded to our Vkontakte group.
Now we need to know the exact size of the menu block. To do this, we will use a useful and simple webmaster program Rect. The program does not require installation, does not create or modify any files. >>> Download the program Rect<<<
We go to the page of our group and measure the distance in pixels from the edge of the field with the title “Discussions” or “Polls” (whichever comes first after the link to the group menu) to the bottom edge of the avatar. The Rect program will show us the width and height in the middle of the window. By the way, the width of the menu block should be exclusively 388 pixels.
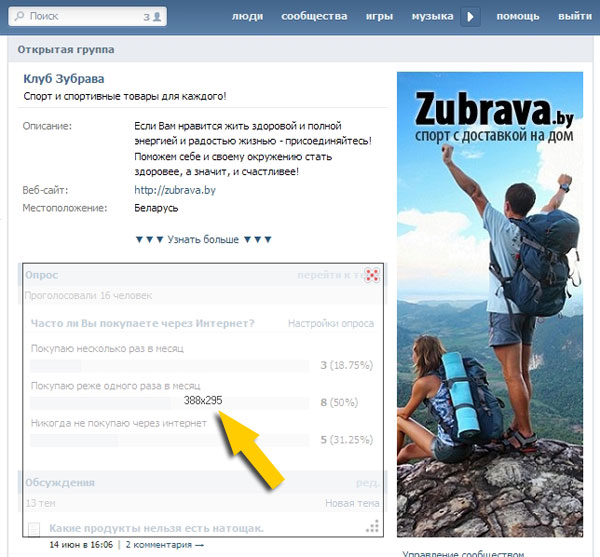
So the height we need in this case is 295 pixels. By the way, I advise you to prepare a description of your group in advance, because the height of the menu block will depend on its volume.
Return to Paint with the remaining picture and cut out the 388 * 295 pixels menu block from the lower right corner.
Insert the cut picture into a previously opened new Paint and enter the text of the menu links into it. How to format the text, see for yourself. The editor allows you to insert various shapes and markers. I am of the opinion that the secret of good design is minimalism, be it Vkontakte or a regular website. For this reason, I use regular underlined text. This is how we are used to seeing links.
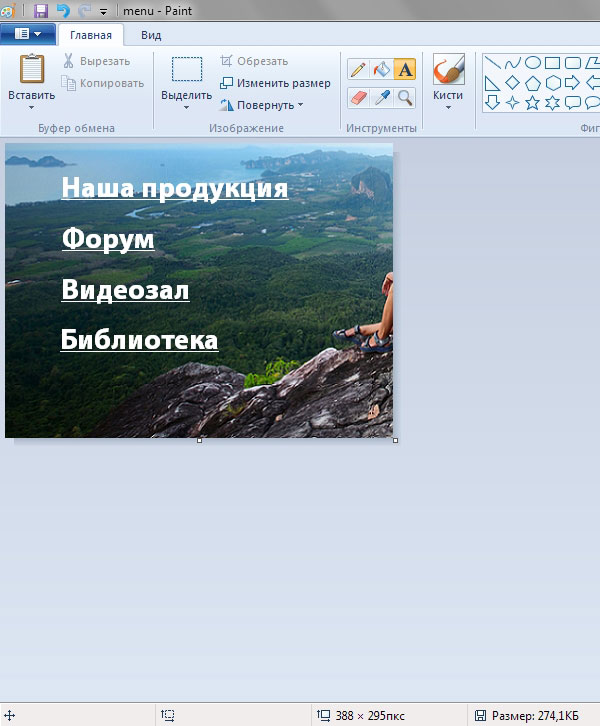
With the now familiar “Select” and “Cut” tools, select and cut each menu item. Paste the picture of each item into a new Paint and save it as a PNG image.

In total, we should get 5 pictures that make up one whole. Why five if there are 4 links? I cut out the lower part as a separate picture without a link. We upload these pictures to a separate album of ours. We will need them very soon.
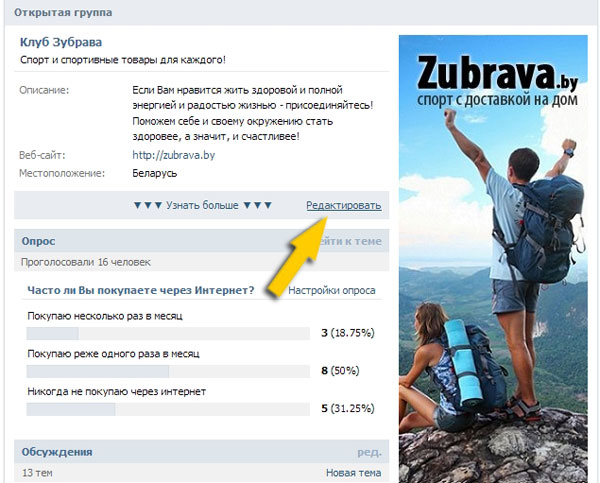
Go to the main page of the group and click on the "Edit" link in the menu bar. It should appear there on hover.
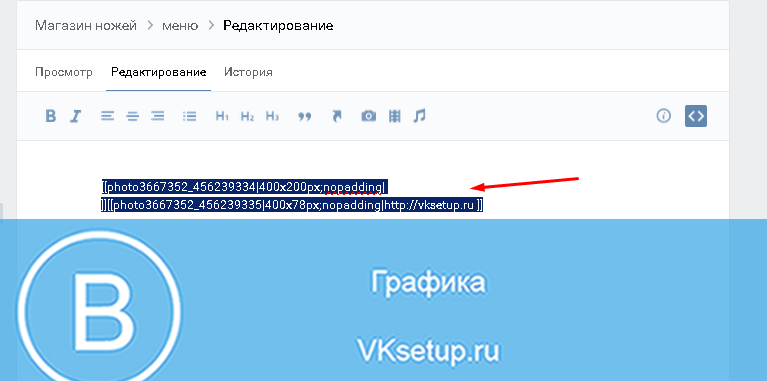
In the menu editor, turn on the wiki markup mode. And we enter the following lines there.
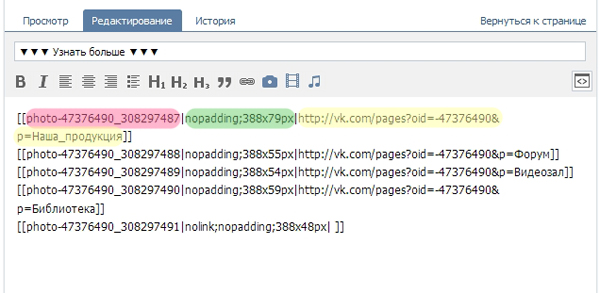
UPD: Attention! Now, for everything to be displayed correctly, you need to swap the tag nopadding and the size of the picture. Place a semicolon after the size of the picture, respectively.
Each line corresponds to one of the composite pictures of the menu block.
In the code, I have highlighted:
- pink - id of the picture. Where can I get it? In the address bar of your browser when viewing a picture.
- green - the size of the picture and the "nopadding" command, which shows the picture without indents.
- yellow - a link to the desired group page.
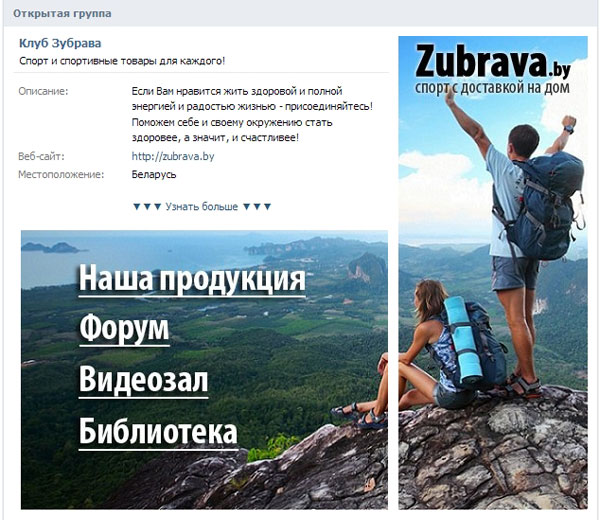
The presence of such a menu, of course, is not the reason for the popularity of the community. But, in my opinion, they make the group page much more pleasant for members and guests. By the way, if you are just starting your path as a Vkontakte administrator, the publication will be useful to you.
This guide is not relevant for public Vkontakte pages. I recommend using this manual for publics -.
But for your users to be comfortable and convenient in your community, it must be properly styled. You need to add an avatar (see), upload a video (see) and photos (see), make a menu.
Now I will show you how to make a menu in a VKontakte group, and arrange it correctly.
We make beautiful graphics
In the new design of the Vkontakte website, the dimensions for graphics have been changed. Below you will find the actual values.
- Group avatar - 200 × 300 px
- Banner in the description - 510 × 271 px
Prepare images in the desired sizes. I will take ready-made pictures to show you by their example.
So, let's make a nice design by dividing the overall picture into two parts. As a result, we will have a unified design.
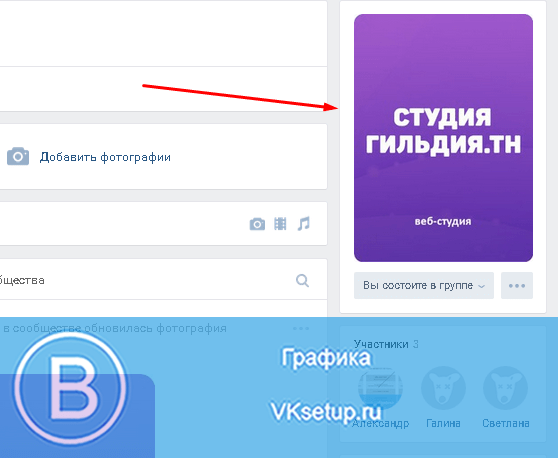
First, load the avatar. Go to the group and click "To upload a photo".
A form will open in which you need to select a file on your computer's hard drive. Do it. As a result, we got the following.
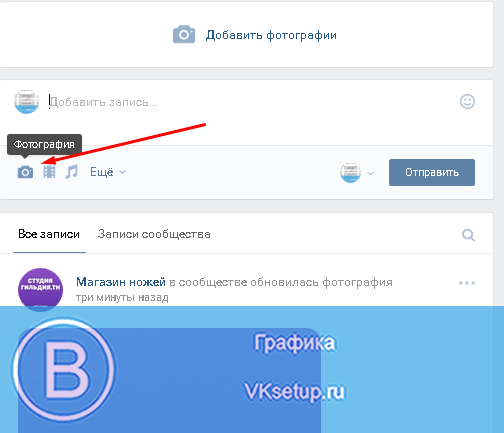
Now let's add the second part of the image. To do this, you need to lay out the picture on the wall, and then record with it, fix it in the upper area.
We go to the wall. Here in the block "Add a note", click on the "Photo" icon.
Load the second prepared image. Be sure to choose to post on behalf of the community. And then click "Submit".

Now the record needs to be pinned (see). We return to the new entry and expand the menu in the upper right corner. Here we click "Fix".
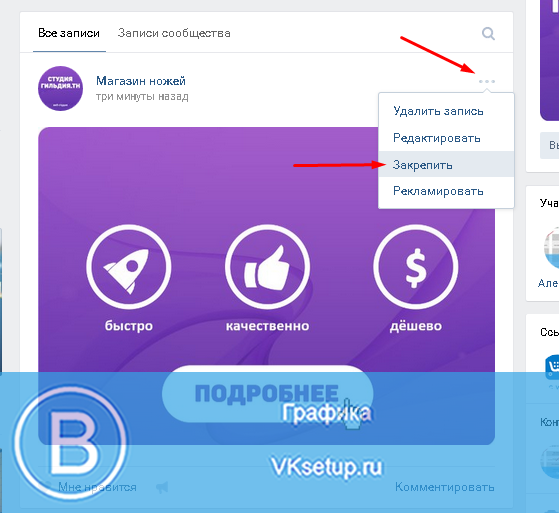
Now refresh the page and see the result.
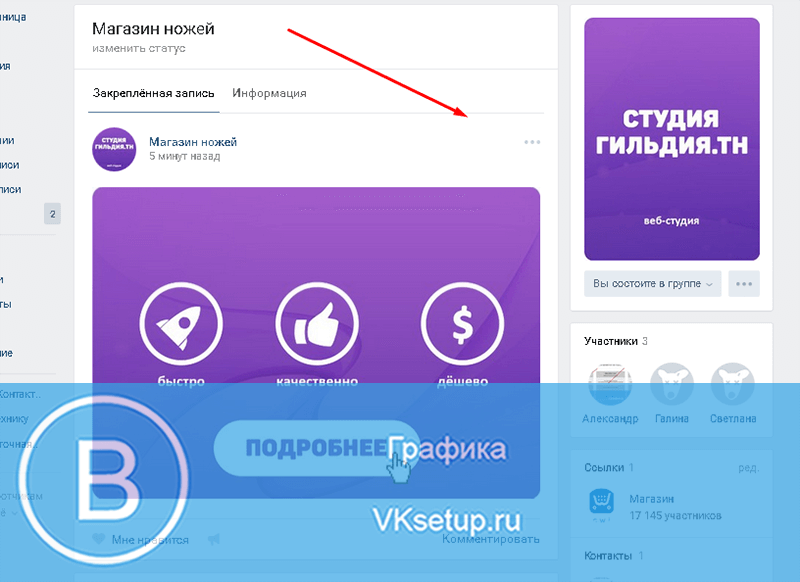
The only negative is that the pictures are at different levels. But this is due to the fact that they are not the correct size. The avatar should be larger vertically. Then they will be on the same level.
How to create a menu in a VKontakte group
Let's go back to our example and imagine that we need to make the "More" button. It is already in the picture. How can we make it a button so that when clicked, a person gets to our main site? I will show you now.
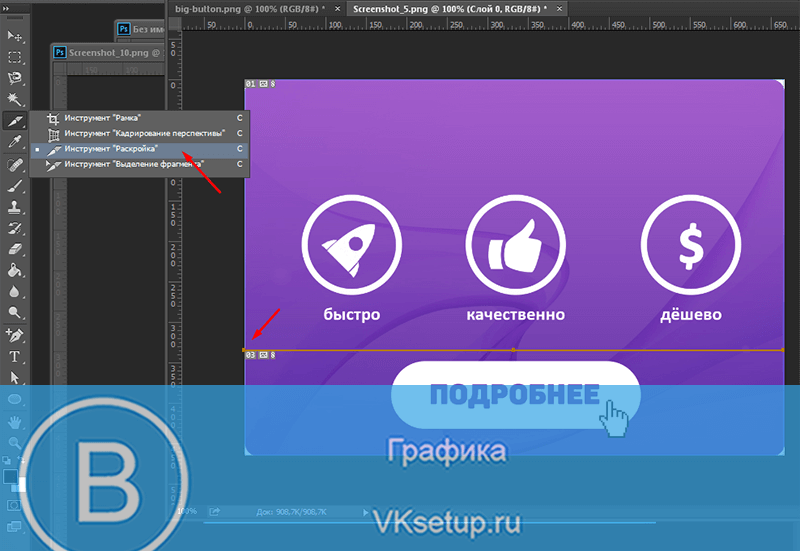
To make active menu buttons, we have to cut them out as separate images. For this we need Photoshop.
We open our picture in the editor, and activate the "Cutting" tool.
Cut off the bottom part with the button. Hold down the left mouse button and draw a horizontal line, cutting the picture into two parts.

Now press Alt + Ctrl + Shift + S to save the finished images.
Http://vk.com/pages?oid=-120208137&p=menu
Look, after the symbols "odi = -", you need to insert the id of your group (see). And at the very end of the link, write a title for your menu page. In the example, we will leave the "Menu" as it is.

Here we click on the camera icon and load the prepared images.

Now let's go directly to creating a menu for a group in VK. You should get something similar.
Next, go to the section "Editing"... Here, for each image, we need to remove indents so that they merge into a single image. To do this, add the following value "nopadding;" in the code. ... And add a link to the desired page or site, registering the value "http://site.ru/page.html" (enter your addresses!). In our example, the button "Details" should lead to the site site. Here's what you should get.
[] []
We save the page. Do not forget to copy its address from the address bar. It should look like:
Https://vk.com/page-120208137_52523487
Go back to the group wall and create a new post. In it we insert a link to the page, and attach the original image. We publish and post.
This is the menu we ended up with.

It is much easier to understand all this if you watch the video tutorial.
Video lesson: how to make a menu in a VKontakte group
Conclusion
Group decoration is an important task. Convenience and comfort for your audience will depend on how well you perform it.
We are used to the fact that an avatar is an impersonation of a user on a social network, his “image”, which we kind of refer to if we want to write something to someone. Therefore, it is easy to guess how important the image is, which is installed on the profile splash screen.
True, not all people pay so much attention to the picture of their page. Let's just say that all users (if we are talking specifically about this issue) can be divided into two groups: those who install their picture on their avatar, and those who do not care about the profile picture. They either leave a standard image, or they use some kind of third-party image.
If we talk about groups, then the situation is different here. If your group doesn't have an engaging, informative photograph, chances are, no one will even join. Therefore, community administrators often ask themselves the question: how to make an avatar for the VKontakte group? In this article we will look at several options for creating it, as well as look at the features of group photos.
What should be the group's avatar?
So let's start with a general theory of what your group photo should look like. Based on this information, you will understand how to make an avatar for the VKontakte group so that users will like it and attract new members.
Obviously, the photo in the group should be relevant to the content that is posted in the community. This is a basic requirement for a picture: its content should be related to what you are writing about. The second requirement is the attractiveness of the image. Since all that the visitor sees about your group is the name and the picture, then, accordingly, the latter should be as attractive as possible so that the user would like to click and go to the page of the community itself. When you want to make an avatar for the VKontakte group, please consider this. The last requirement for a group photo would be information content. Roughly speaking: it would be advisable to depict on the avatar what the user hints about what the group is doing. This can be done, for example, using labels.

We are looking for a finished picture
In the list of ways to create a group photo, the search for a finished image is the most popular and easiest at the same time. All you have to do is go to the image site and find a category of images related to your group's theme. The most successful photo can be saved and edited (or even just posted on the community page without changes).
Making an avatar using online editors
The second option is editing ready-made images (or creating new ones) using online editors. Fortunately, now there are many services that allow you to develop your avatar both "from scratch" and using one of the ready-made templates. You just need to decide what you would like to see in the image for ava, and then how to make an avatar for the VKontakte group without Photoshop, you don't even have to worry - the resource will do everything automatically. There are a lot of such ready-made solutions on the Web now. They are free and feature rich. The only disadvantage of working with such sites is the address of the resource that the avatar made for you, posted somewhere in the lower corner.

Making an avatar in Photoshop
If you don't know how to make an avatar for the VKontakte group without a link to someone else's site, you will have to use the most popular This is Photoshop. Working with it is quite simple, the main thing is to understand the basics, to deal with elementary concepts and categories with which the program functions. If you already have at least minimal experience of interacting with her, it will not be difficult to create an avatar for you. If you don't know at all how to make an avatar for the VKontakte group in Photoshop, you will have two options. The first is to ask for help from a person who knows how to work in the program, the second is to study the features of the editor on your own: find lessons, examples of work, practice yourself.
Create an avatar
Finally, after we answered the question “How to make an avatar for the VKontakte group?”, It’s time to think about what will be shown in the photo in the group. As noted, it should be something themed, engaging, and informative. We suggest that you take a piece of paper and a pen and sketch out your community logo. Then you can start creating the image.
This can be done in one of the above ways. If you don't know which avatar is better, you can resort to a simple but effective method of determining: voting in the group itself. Let people decide which photo is best.
Hello, friends. Everything moves, everything changes. The social network Vkontakte is also moving forward. So my publication on the creation of a single Vkontakte block has become irrelevant today. Now, when creating a group, the News block, which was necessary for such a menu, is simply missing.
Fortunately, Vkontakte has the ability to create wiki pages. With this wiki page, we can create a community menu, and then pin this menu to the top of the group.
So let's go in order.
How do I create a wiki page?
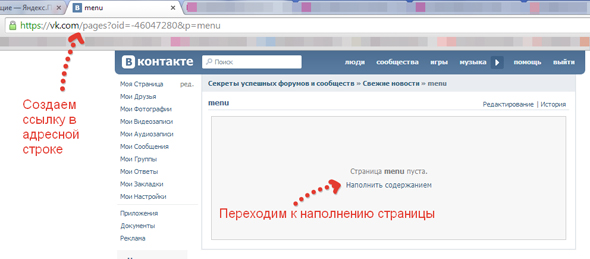
1. Create a link in the address bar of your browser like this:
- xxx- id of your group or public page;
- Page_name- any word you use to name your page.
How do I find the id of your community? If id is not contained in the link, for example, https://vk.com/make_community, it can be recognized as follows. Click on the heading of the group wall, where the number of publications is written.
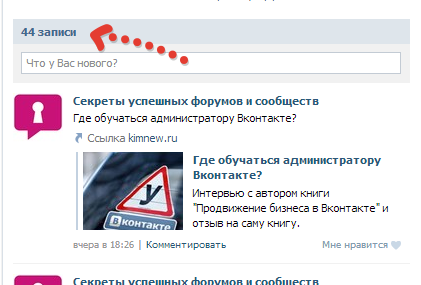
Your community wall will open separately. There will be numbers in the address bar. This is your community id.
2.
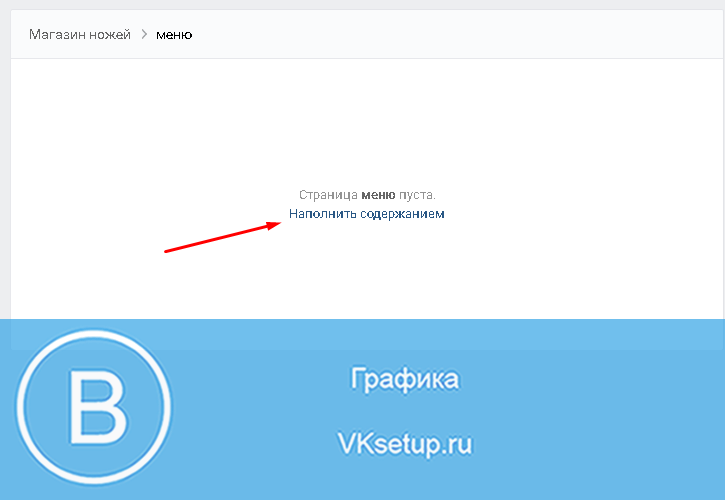
Follow the link you created and click “Fill with content”.
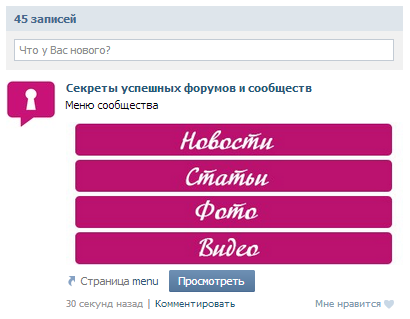
3. Fill your page with content. For example, we need a graphical menu in the form of separate buttons. First, we create the whole picture.

Then we cut it into separate buttons. In this particular case, we should have four button pictures.
We return to our page and, using the built-in editor, load our button images.

After loading all the images, it should look like this:
By clicking on any of the pictures, you can specify a link to the page where this menu item will lead. This can be either your community page or an external site or online store page.

We create a menu.

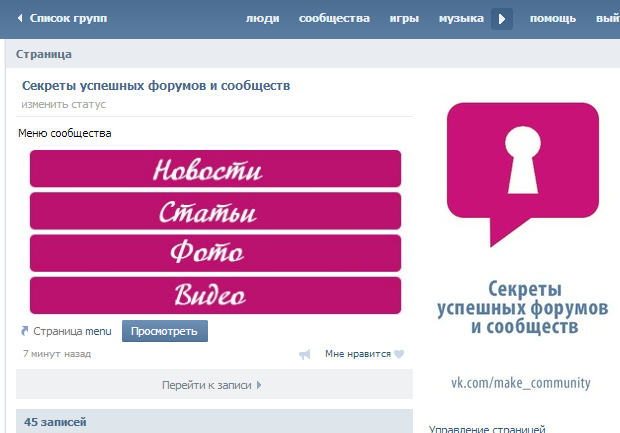
You should get the following entry on the wall of your Vkontakte group:
How do I pin a menu?
All that remains is to pin the menu to the top of the group. To do this, click on the text in front of the picture in the post. In the window that opens, at the bottom right, click “Fix”.

Everything. Now we should have something like this:
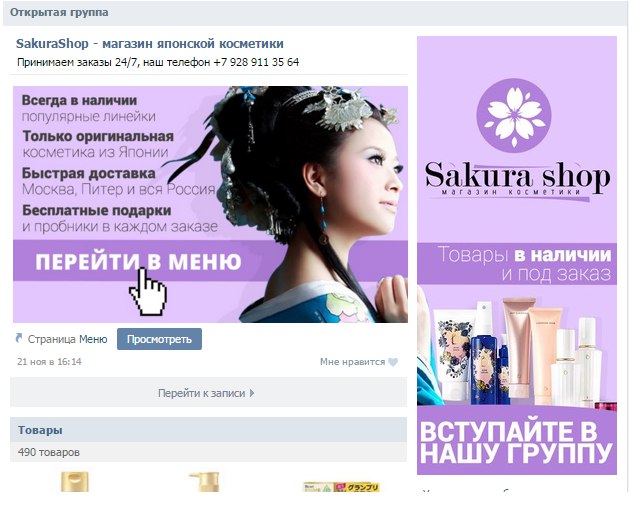
If you want to make the menu and the avatar seem to be one whole, just choose the picture in such a way that it would be a logical continuation of your group's avatar.
In all Vkontakte communities in which you can structure information, I recommend making a menu. This will definitely improve the usability of your community. And we have discussed how to fix the Vkontakte menu using a specific example. It remains to wish you the best in developing and promoting your communities!
Hello everyone, this is Roman Litvinov, designer of the Ardens.pro team. Today I came to you with a guide-tutorial on how to create a single block of an avatar and a Vkontakte menu (as a whole). For starters, examples of what it will look like.
Examples:

Avatar markup for VK group
We need a grid to start. To do it, we take a screenshot of the group page and throw it into the project, in my case, in Photoshop.

Then, using the CTRL + R keyboard shortcut, call the rulers and place the guides along the edges of the avatar and the clip. In order to extend the guide, you need to hold down the LMB on the ruler and pull towards our layout.

The size of the avatar that we see in the browser without scaling is 200x500 pixels. And fixing in this form is 395x237 pixels.
Cutting
We made the markup, now let's start cutting. Why now? Because this is almost the end of my guide.
For cutting, we need the "Cutting" tool (in the English version of the "Slice tool")
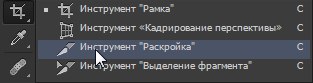
Using this tool, we cut along our guides, specifically inside the avatar and fasten along the edges.
It should look like this. 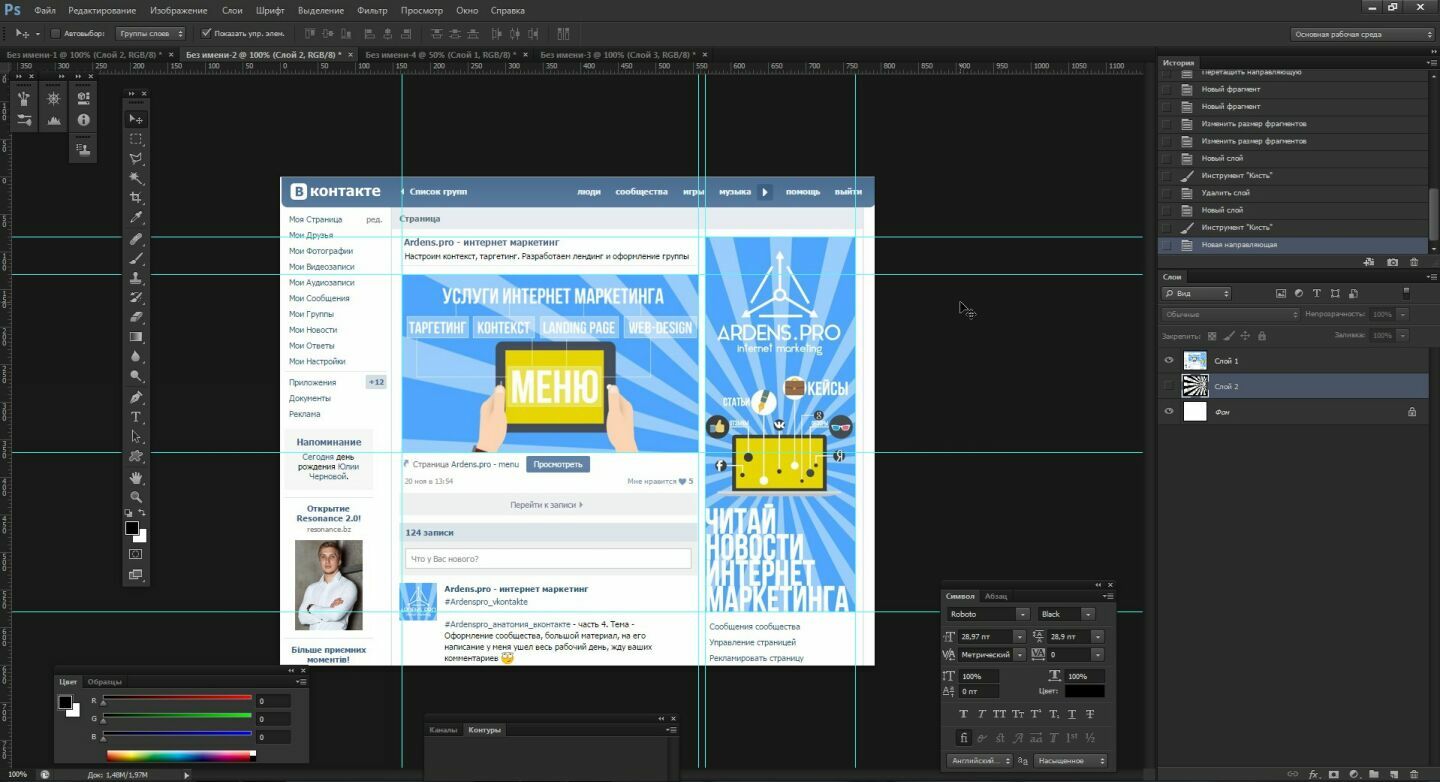 Next, remove our screenshot from the layers and start the project. We will not develop the design, but I will show what happens. Let's add a photo of a girl to our project. The main thing for us is to get into the area of avatar cutting and fastening.
![]()
After working on our design, save the cut parts using CTRL + SHIFT + ALT + S or File-> Save for web ...
In this window, with Shift pressed, select our avatar and press save 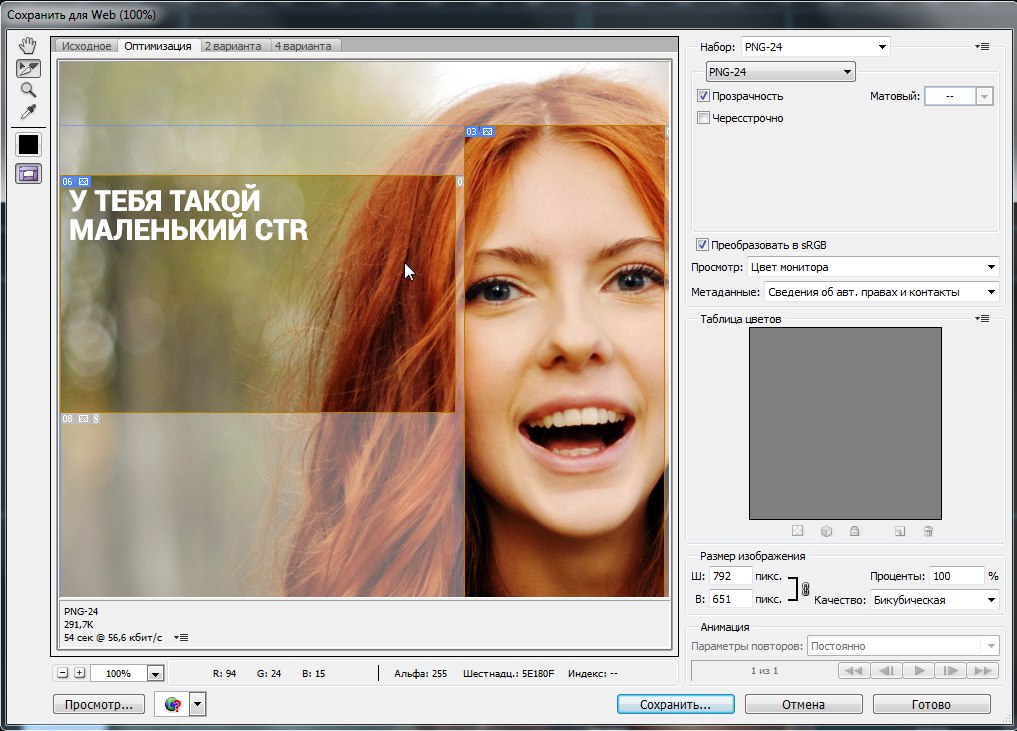 But there is still more to come. In the window that appears, select Fragments, select "Selected Fragments Only" and click save. After that, Photoshop will cut off an area with an avatar and a clip from the entire layout.
In the folder where we saved the cut, we will see something like this. 
A single block of an avatar and a menu for the Vkontakte group
Feel free to fill in our avatar and fix it to the test group to see the result 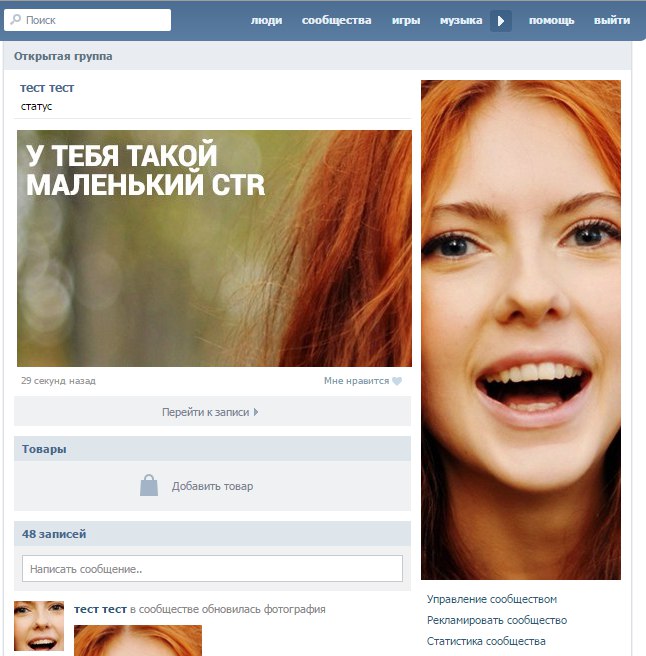
So, thanks to such actions, you will get a single block of an avatar and a menu in Vkontakte groups.
Completion
I hope my mini-guide was useful and you will be able to make your groups more beautiful and memorable.
Useful articles on related topics:
Funny video (sometimes you can't understand "photoshop" or not)
Attention! Competition:
I will give a set of stickers to choose from to the one who repeats this lesson, and he will be able to make an avatar and fix it in one piece 😉
Like, comment, throw muffins or tomatoes in our group
